Polyhedron models assembly instructions
I made an early attempt at doing written instructions and found that none of my testers read them, so I have resorted to short videos of the assembly and parts keys. I recommend that you use the practice octahedron or parallelepiped models and assemble whilst stepping through the videos. I also recommend that you dismantle the practice model and reassemble a few times until you feel you are getting the knack of joining pieces quickly and accurately.
Parts keys
General notes
- dexterity, patience and practice needed
-
these models are not intended for assembly by young children. The youngest ages I tested with were young teenagers, who were able to assemble when working in groups with adults. They also fed back that it was enjoyable working in a group. It may be possible to do some of these with younger children, but you will need to test this yourselves. Some of the later propeller unit based designs would be easier for younger children.
- scorelines on the outside
-
folds on face and edge models should be made so that the score lines are on the outside of the fold.
- tools
-
the assembly can be done without any tools, but a thin bladed screwdriver or knife is occasionally useful to manipulate tabs into place on both the face and edge models. A cutting mat or other clean flat area is also useful, particularly folding and pressing down tabs on the face models and the long edges on the edge models against a mat gives a faster and more accurate fold.
- production line
-
most sets will have many faces or edges. You can prepare (detach and fold) and assemble the pieces one by one but I find it much faster to do this as a production line 1. detach all the pieces, 2. fold all the pieces on the mat 3. assemble the model. Personally, I find steps 1 and 2 do get a bit boring, but 3 is the enjoyable part and seems more 'mindful' to me if all the pieces are ready to join rather than preparing one by one. This is a personal preference for me - either way works the same in the end.
- gluing - no-glue necessary
-
however the models do become very much more robust if glued. I have found that white glue (PVA) works well. Use glue sparingly, too much will warp the paper. If a tab has torn off during assembly and you have run out of spares then the model can still be completed by gluing those pieces.
- decoration
-
painting and wood veneering
Face model assembly (2 min video)
Tips and notes for face model assembly
- slide together vs tuck in joining
-
The tab design on the polygon faces has been modified slightly since the above video as many of the testers seemed to prefer a method of tucking the tabs into place rather than the slide method. The current design makes tucking in a bit easier but the slide method is still much quicker once you get used to it. Some tucking in of tabs may be useful as you get to the final faces. Try out both methods on a practice model. See below for more detailed images of the slide together method.
- final face frustration
-
getting the last face correctly joined in can be very frustrating. Again this becomes easier with practice If you really can't bear the frustration then alternatives are to join one edge of the final face and trim down the tabs on remaining edges with scissors so that they drop into place more easily. Depending how heavily you trim, you may then need glue to hold the final face in place.
- oblate edges first, acute last
-
each platonic model is completely regular but the archimedean and particularly the rhombic models have some more acute edges and some more oblate (obtuse). When joining the edges of the faces there is less to press on with the oblate joins so it is better to assemble so that the final face joins are the more acute ones.
- faces one by one vs net
-
some testers tried assembling all the faces for a model into a 2D net then joining edges on this into the final 3D form. We generally found this difficult to manage with larger numbers of faces and found it easiest to assemble the faces one by one in 3D position.
- gluing
-
glue either on the tab surface or under the face where the tab will sit and then join the faces into position. Patience is needed here as you must wait until the glue dries enough to fix in place before attempting the next face otherwise the prior face will be pushed out of position. This only takes a minute or so if you use the glue sparingly. One approach is to work on two models in parallel so that one is drying as you assemble the next face on the other.
- disassembly
-
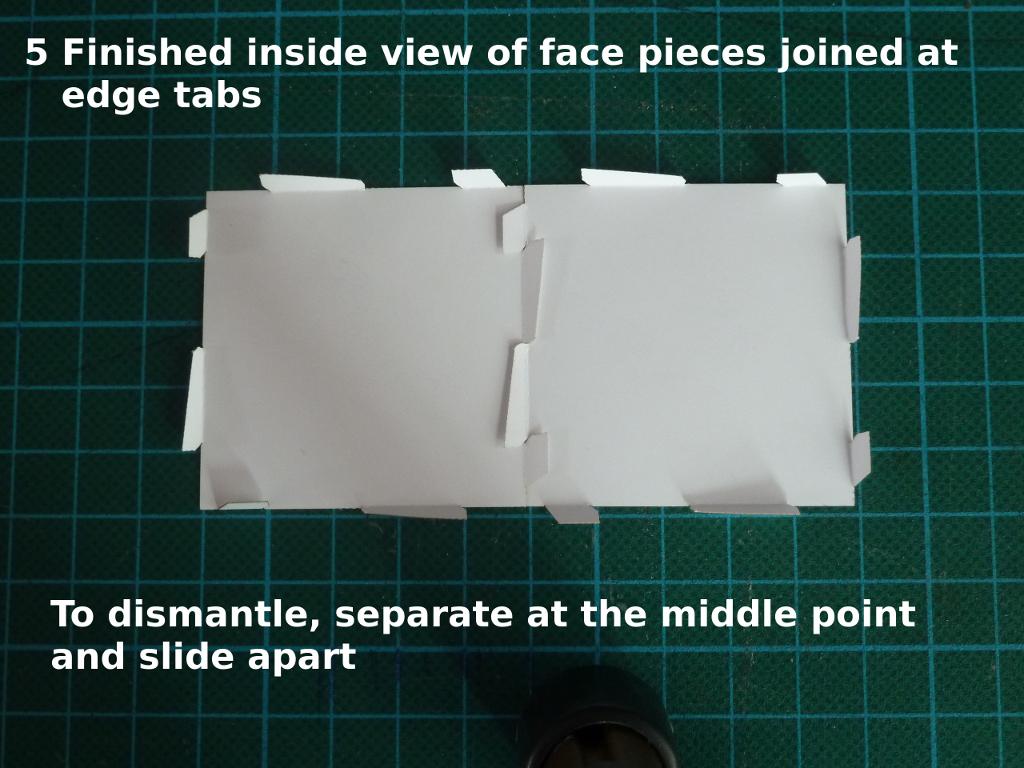
part the tabs at the middle then slide the edges apart. This can be done from the outside of a model by inserting a small screwdriver or knife and levering the middle tabs apart
Slide together method for face model pieces
I find this much faster than 'tucking in' the tabs. Typically a few seconds to join an edge correctly. I think it requires developing a 'knack' because assembling from the outside, as shown in the above video, means that the tabs cannot be seen as they are joining so it has to be done somewhat by feel.
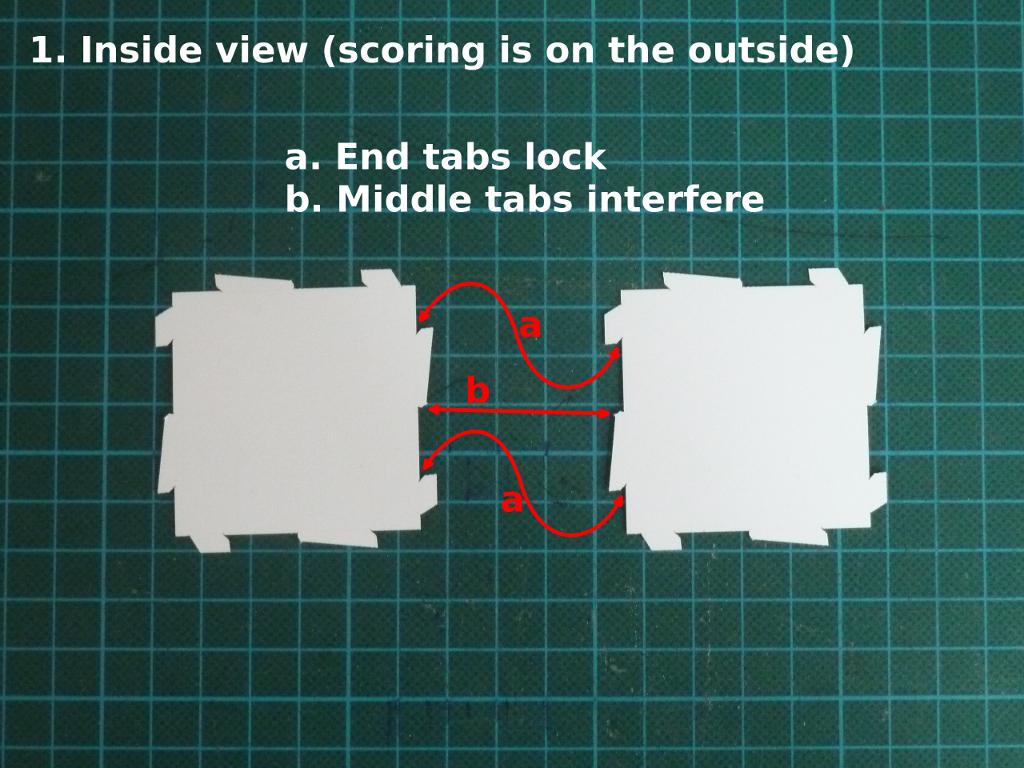
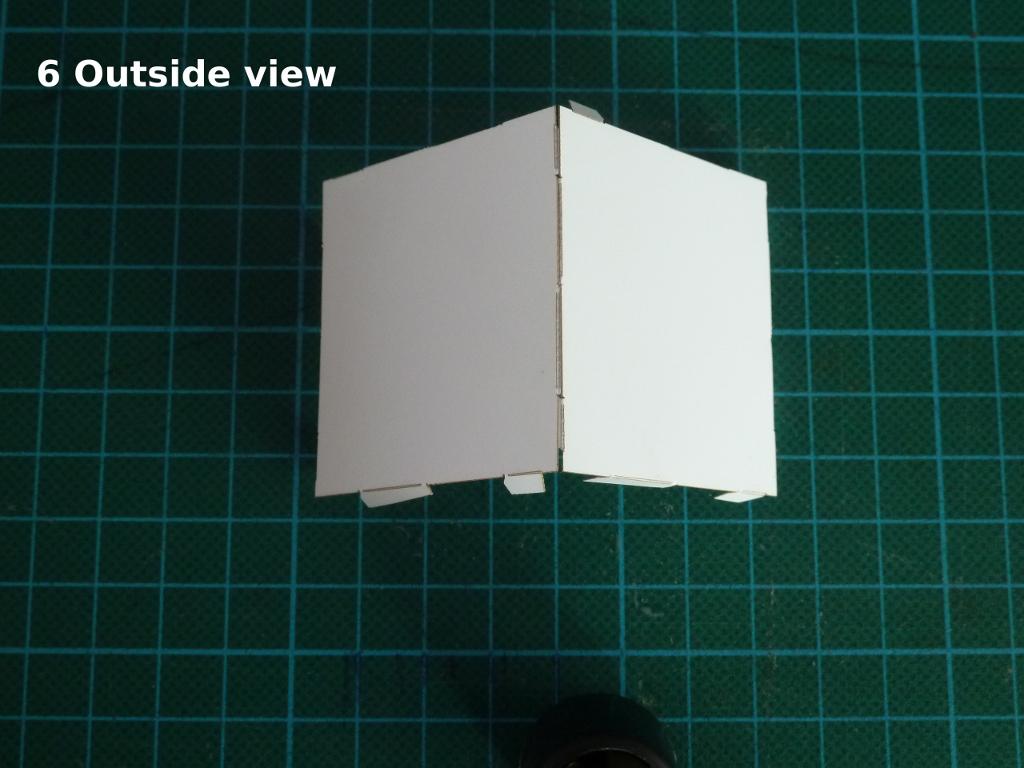
The images below show how this looks from the inside, you can practice this to understand the joining better but as the model takes 3D form you will have to work from the outside.
Try joining two faces from inside on a mat a few times, as shown in the images below, before trying from the outside.
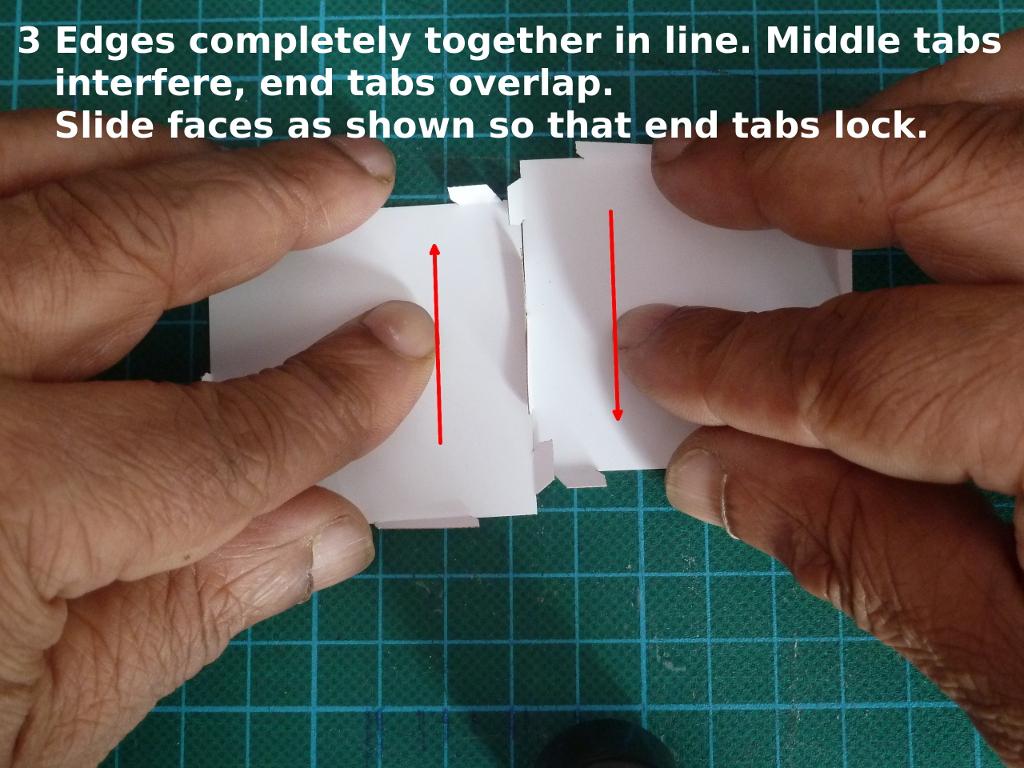
It is important to note that when sliding together in images 3 and 4, the edges must be brought together offset and in the same straight line. Each face is kept flat but when working from the outside to assemble a complete model, the tabs will be folded in more, approximately to the dihedral angle required for the polyhedron being made, so the faces will need to be at an angle relative to each other rather than in the same plane as on the mat, but the edges kept straight.
When working from the outside, hold the faces lightly in each hand and when bringing the edges together and do not try to tuck individual tabs in one by one, rather it should be the whole edge aligning and sliding into place in one go.
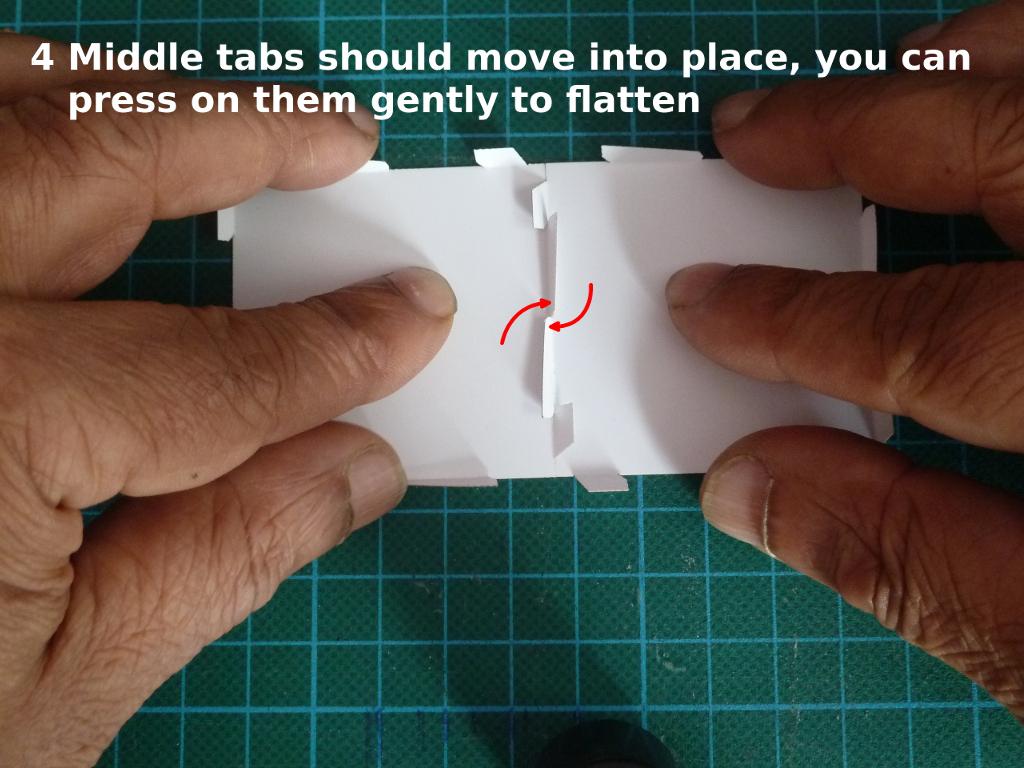
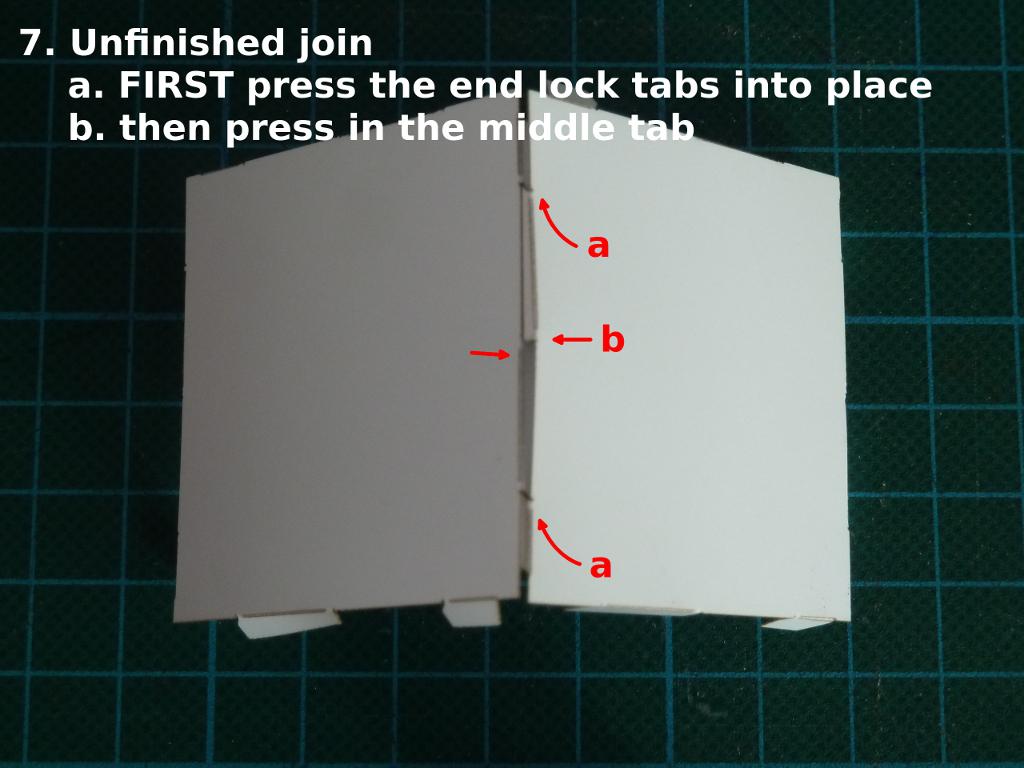
The final image shows what to do if you do not get a clean join and the mid point tabs are still sticking out.

Edge model assembly (2 min video)
As with the face models, the vertices of the edge models are mainly assembled from outside the model so again there is some element of 'feel', in this case you have to feel the tabs folding over the slots rather than see them while you are assembling.
Tips and notes for edge model assembly
- acute vertices first, oblate last
-
with the edge models you may find it difficult to get your fingers under the more acute vertices in order to fold the tabs back. Therefore when joining edges at vertices it is better to assemble so that the final vertices are the more oblate ones i.e. the opposite of the face model advice above.
- fully insert tabs in slots before folding
-
if the tabs are not fully inserted in the slots you may feel that they do not press down easily when you fold them down over the flaps. If you feel this, try just unfolding the tab, and folding again (without pulling apart), this will normally bed the slot and allow the tab to fold down better. Conversely if the tabs are fully inserted into the slots they will usually fold down more easily.
- tools
-
for the more acute vertices and particularly if you have large hands or fingers then using two screwdrivers or similar works well. Once the tabs are engaged with the edge lying on a surface you can use one screwdriver to hold a flap in place and fold over the tab with the second screwdriver.
- gluing
-
the edge models can be glued after assembly. Use a screwdriver or other tool to smear a drop of glue under the tab surface and then press onto the back of the flap.
- gluing2
-
the tabs on the edge models are quite narrow. Poor handling or too deep scoring on the laser cutter may lead to tabs tearing off. Again practice is important to get settings and handling refined but if you do tear off a tab, you can still glue the underside of one edge at a vertex onto the edge below it. This will usually not be visibly different in appearance to a no-glue join.
- disassembly
-
unlock an edge by opening (unfolding) the tab from over the slot flap. The edges can then be separated by sliding the tab out from the slot.